How To Make Greek Yogurt

Jenny Skrapaliori-Graves | Last Updated: December 4, 2025

A ceramic bowl with yogurt on a cloth napkin, fig halves above it and a corner with another bowl with yogurt and a spoon.

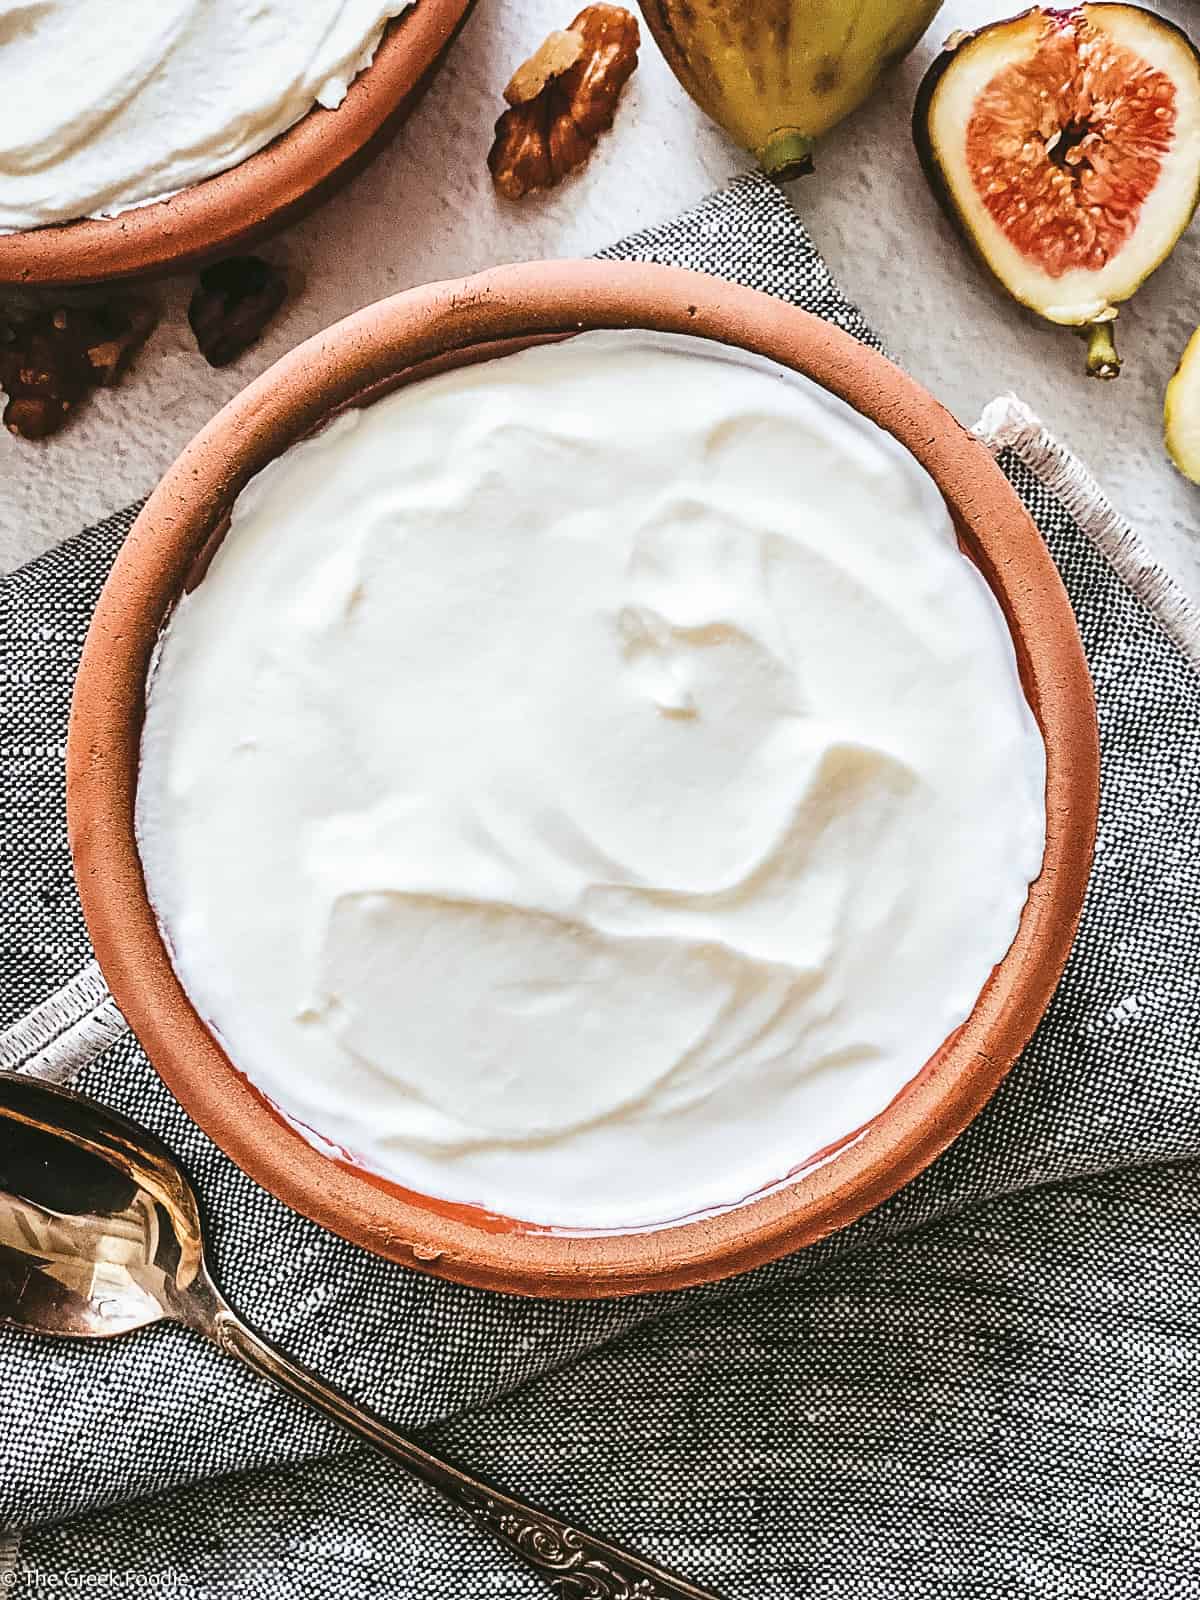
Learn how to make Greek yogurt at home with just two ingredients.
This simple homemade Greek yogurt recipe gives you thick, creamy, tangy yogurt in just a few hours — no special equipment needed. It’s perfect for breakfast, meal prep, smoothies, cooking, and baking, and it tastes far fresher than most store-bought brands. Plus, it’s budget-friendly, clean-ingredient, and endlessly versatile.


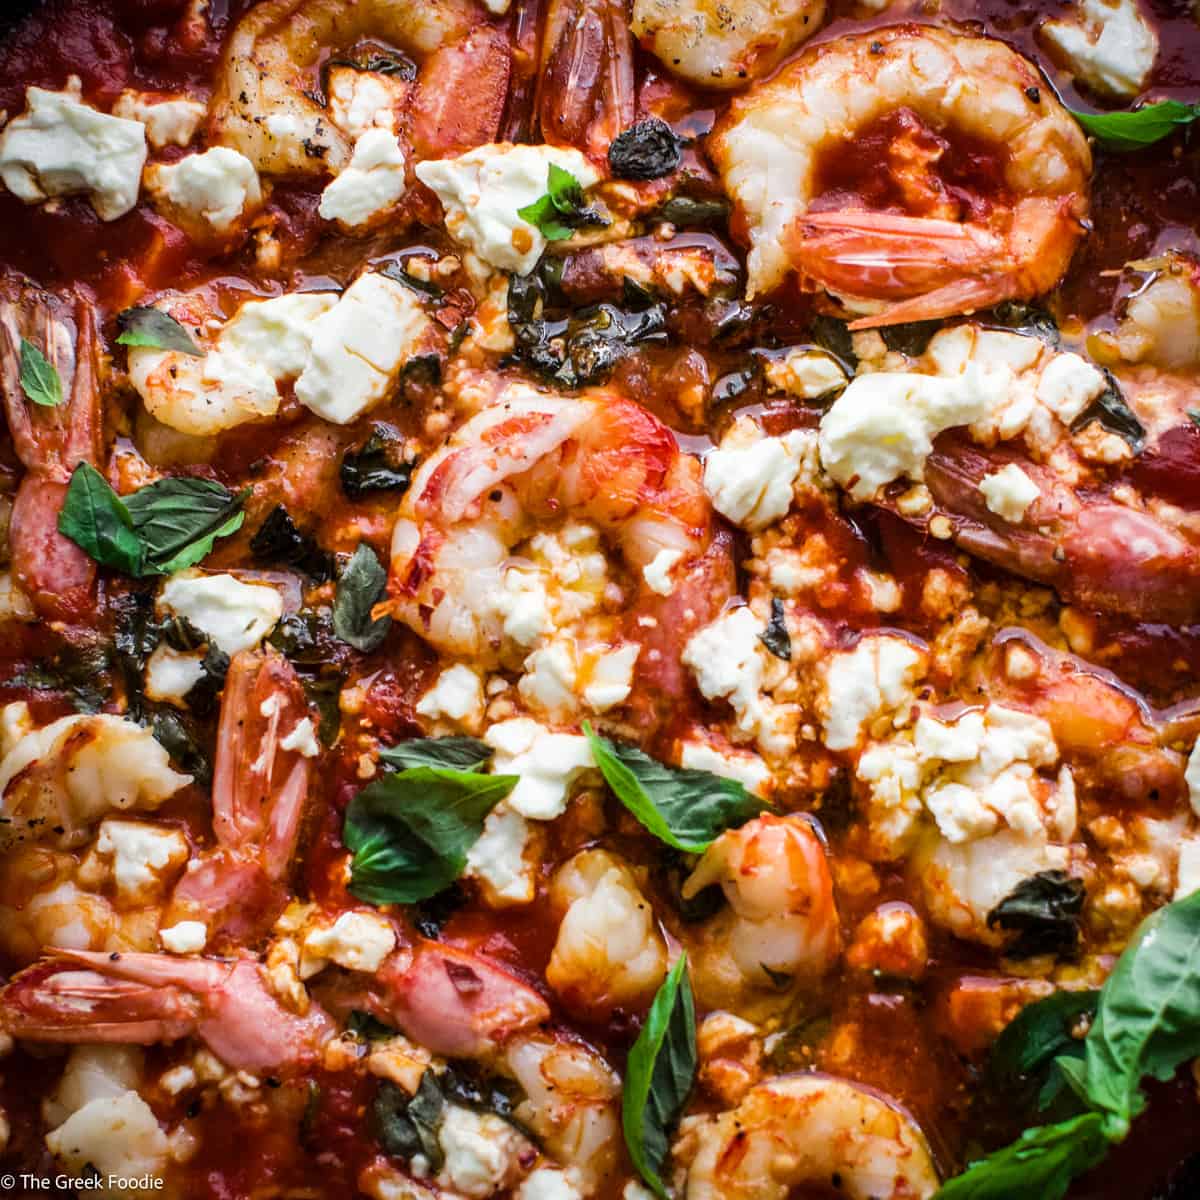
If you love this Greek yogurt post, you will also love this Greek Breakfast Feast, Galaktoboureko–Phyllo Custard Dessert, or Portokalopita – Greek Orange Phyllo Cake!

A ceramic bowl with yogurt  and a spoon on a cloth napkin, fig halves above it and a detail of another bowl.

What is Greek yogurt?

Greek yogurt is regular yogurt that has been strained to remove most of its whey, leaving behind a thick, velvety, protein-rich yogurt with a naturally tangy flavor. Straining concentrates the yogurt, making it creamier, richer, and ideal for both sweet and savory recipes. You may also hear it called strained yogurt, which is the traditional Greek method.

Two ceramic bowls with homemade greek yogurt, a spoon on a cloth napkin, fig halves, walnuts, a honey dipper and a jar with honey. and a detail of another bowl.

Why you will love making Greek yogurt


  • PURE INGREDIENTS – You choose the milk and the starter, so there are no preservatives, stabilizers, or added sugars.
  • FRESH, INCREDIBLE FLAVOR – Homemade Greek yogurt is thicker, creamier, and noticeably richer than most store-bought options.
  • BUDGET-FRIENDLY – Make a big batch for a fraction of the cost of premium Greek yogurt brands.
  • ENDLESS USES – Perfect for breakfast bowls, dips, marinades, baking, smoothies, and savory cooking.
  • SURPRISINGLY SIMPLE – Two ingredients, a little patience, and you get a big container of authentic Greek yogurt.

This is what you need to make Greek yogurt

Ingredients for homemade greek yogurt. A cheese cloth, a milk thermometer, a small bowl with yogurt and a sauce pan with milk on a butcher block.

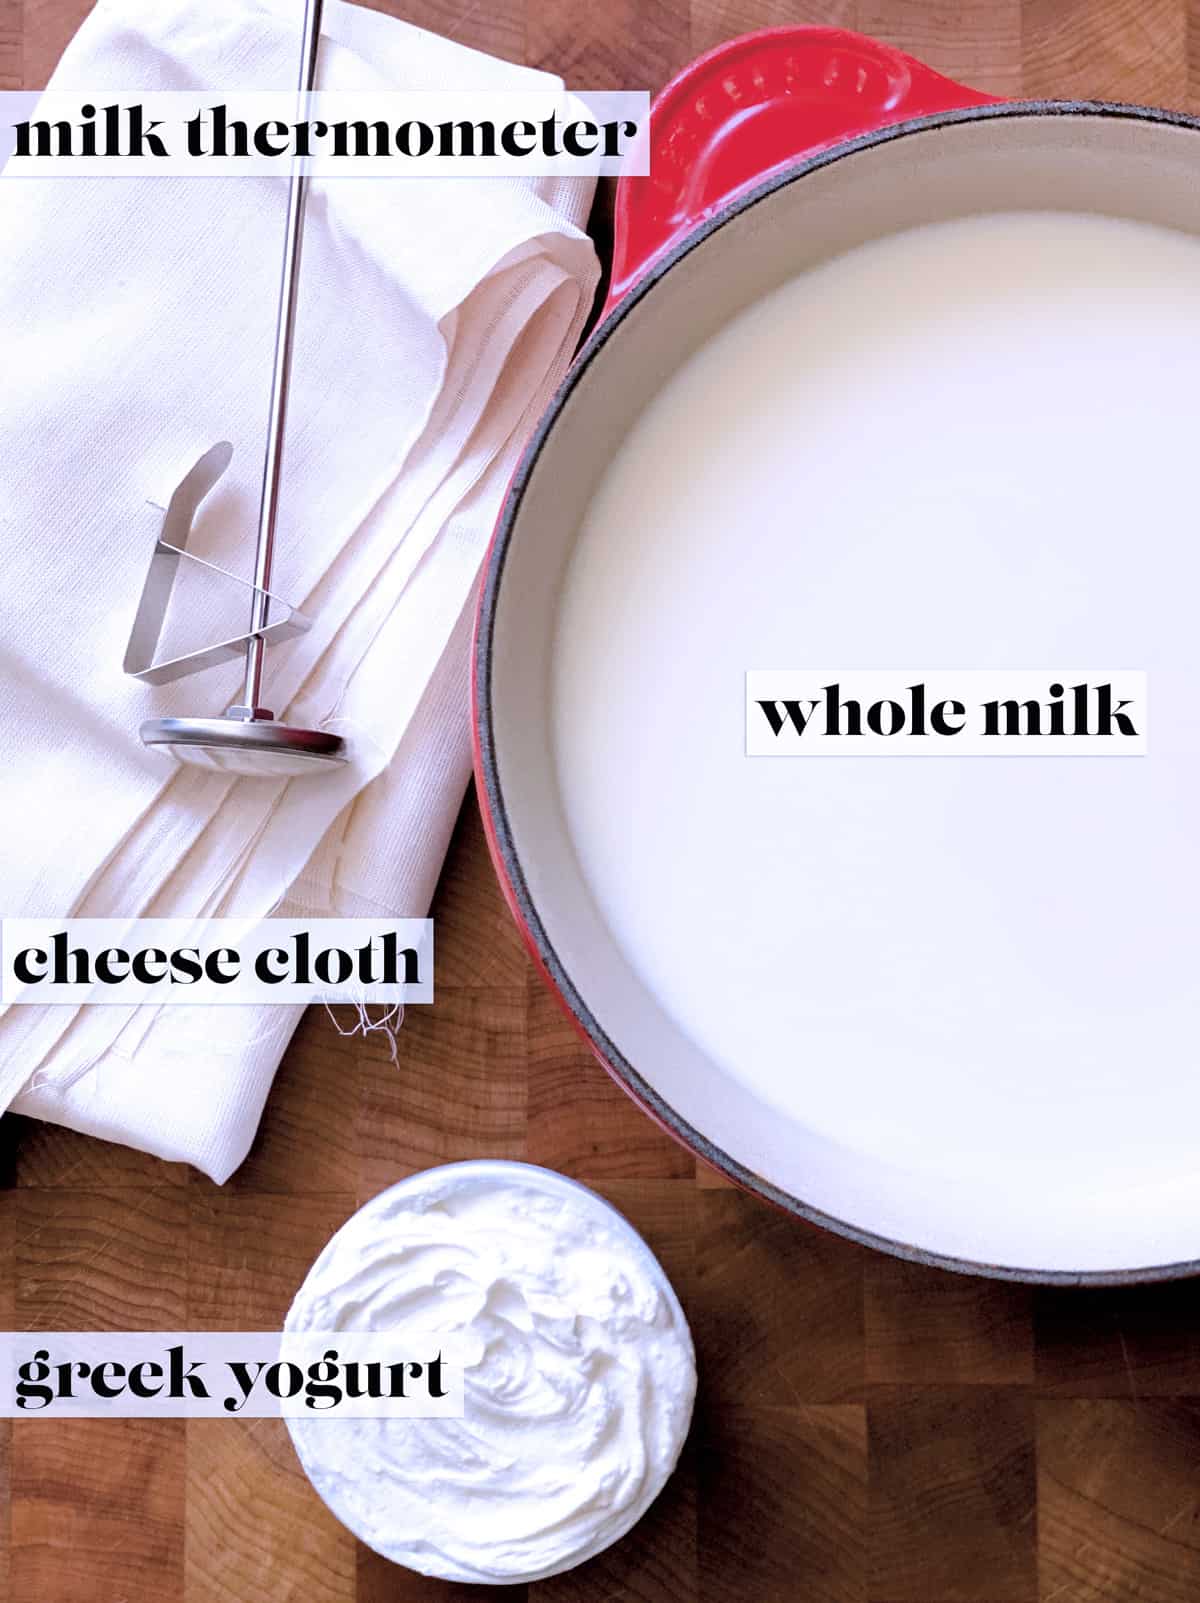
You only need two ingredients and a couple of basic kitchen tools to make delicious, authentic Greek yogurt at home.

Step by step

A big sauce pan with milk and a thermometer.

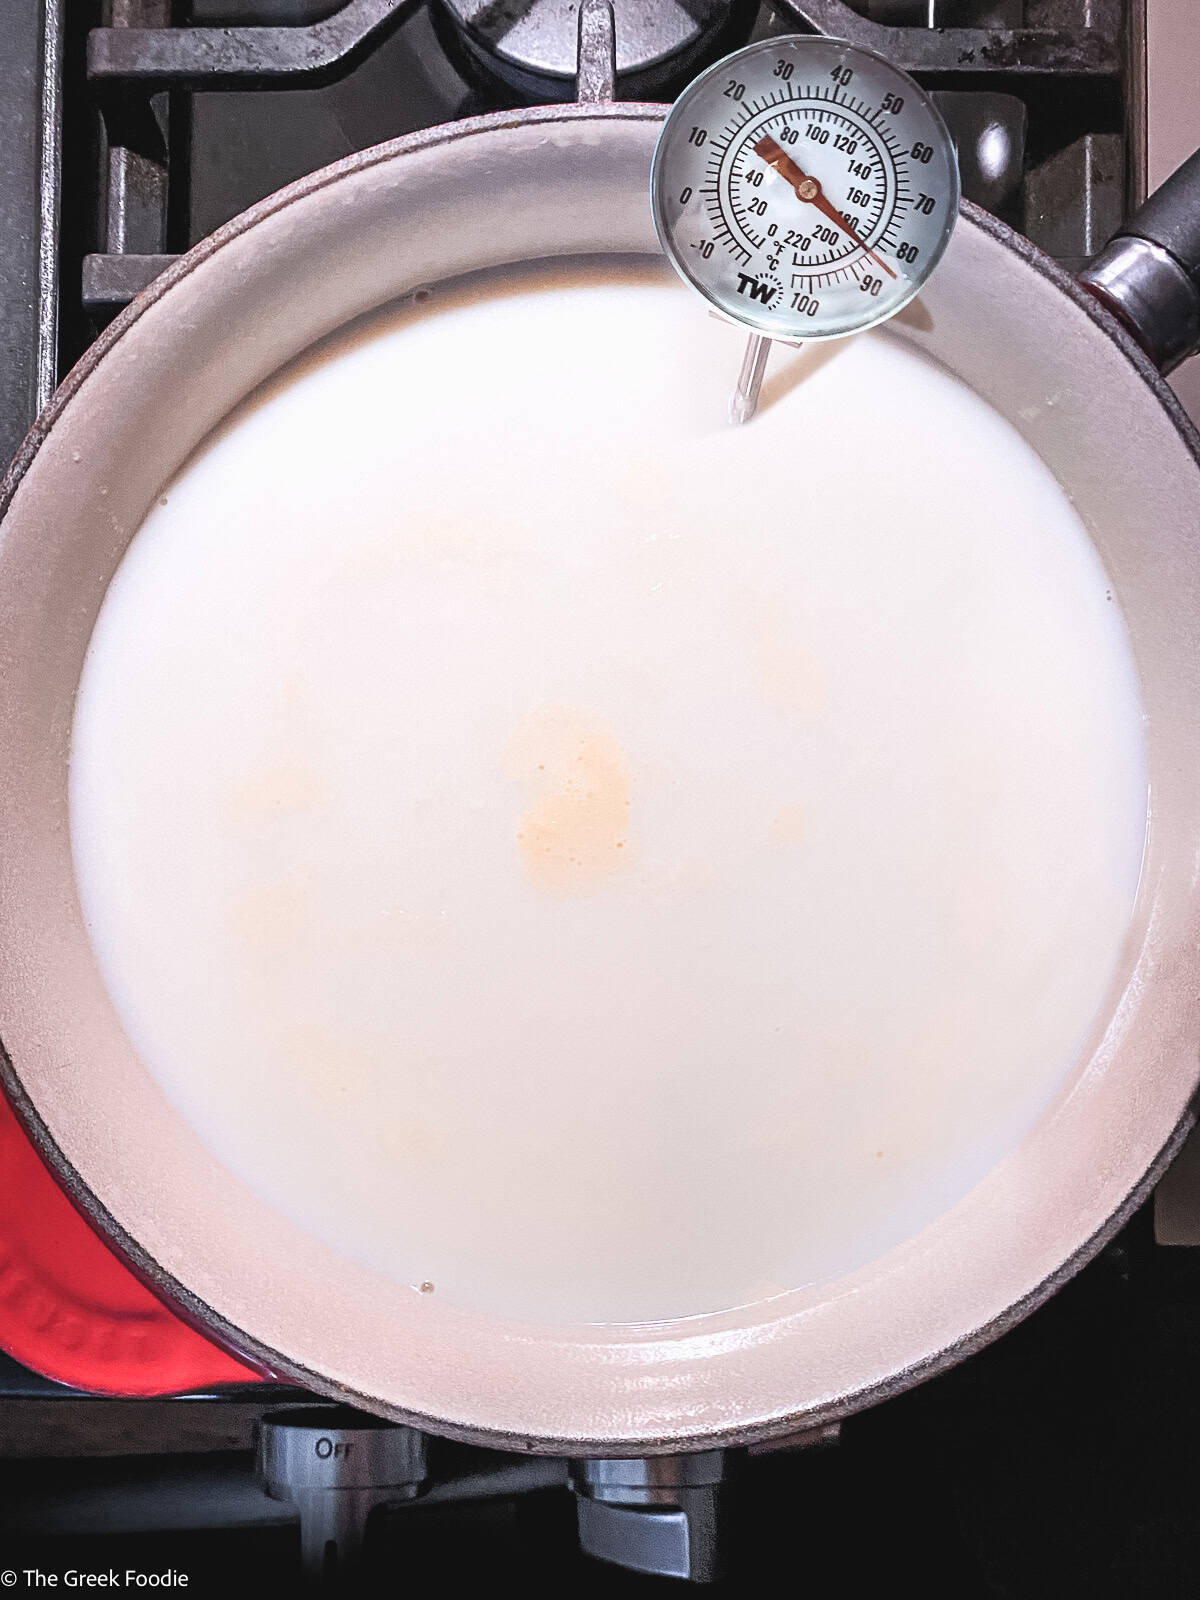
Step 1: Put the milk in a pot with a thick bottom and place it on low to medium heat. Simmer milk for 18-20 minutes until milk temperature reaches 185°F / 85°C.
Remove from the heat.

A big sauce pan with milk and a thermometer.

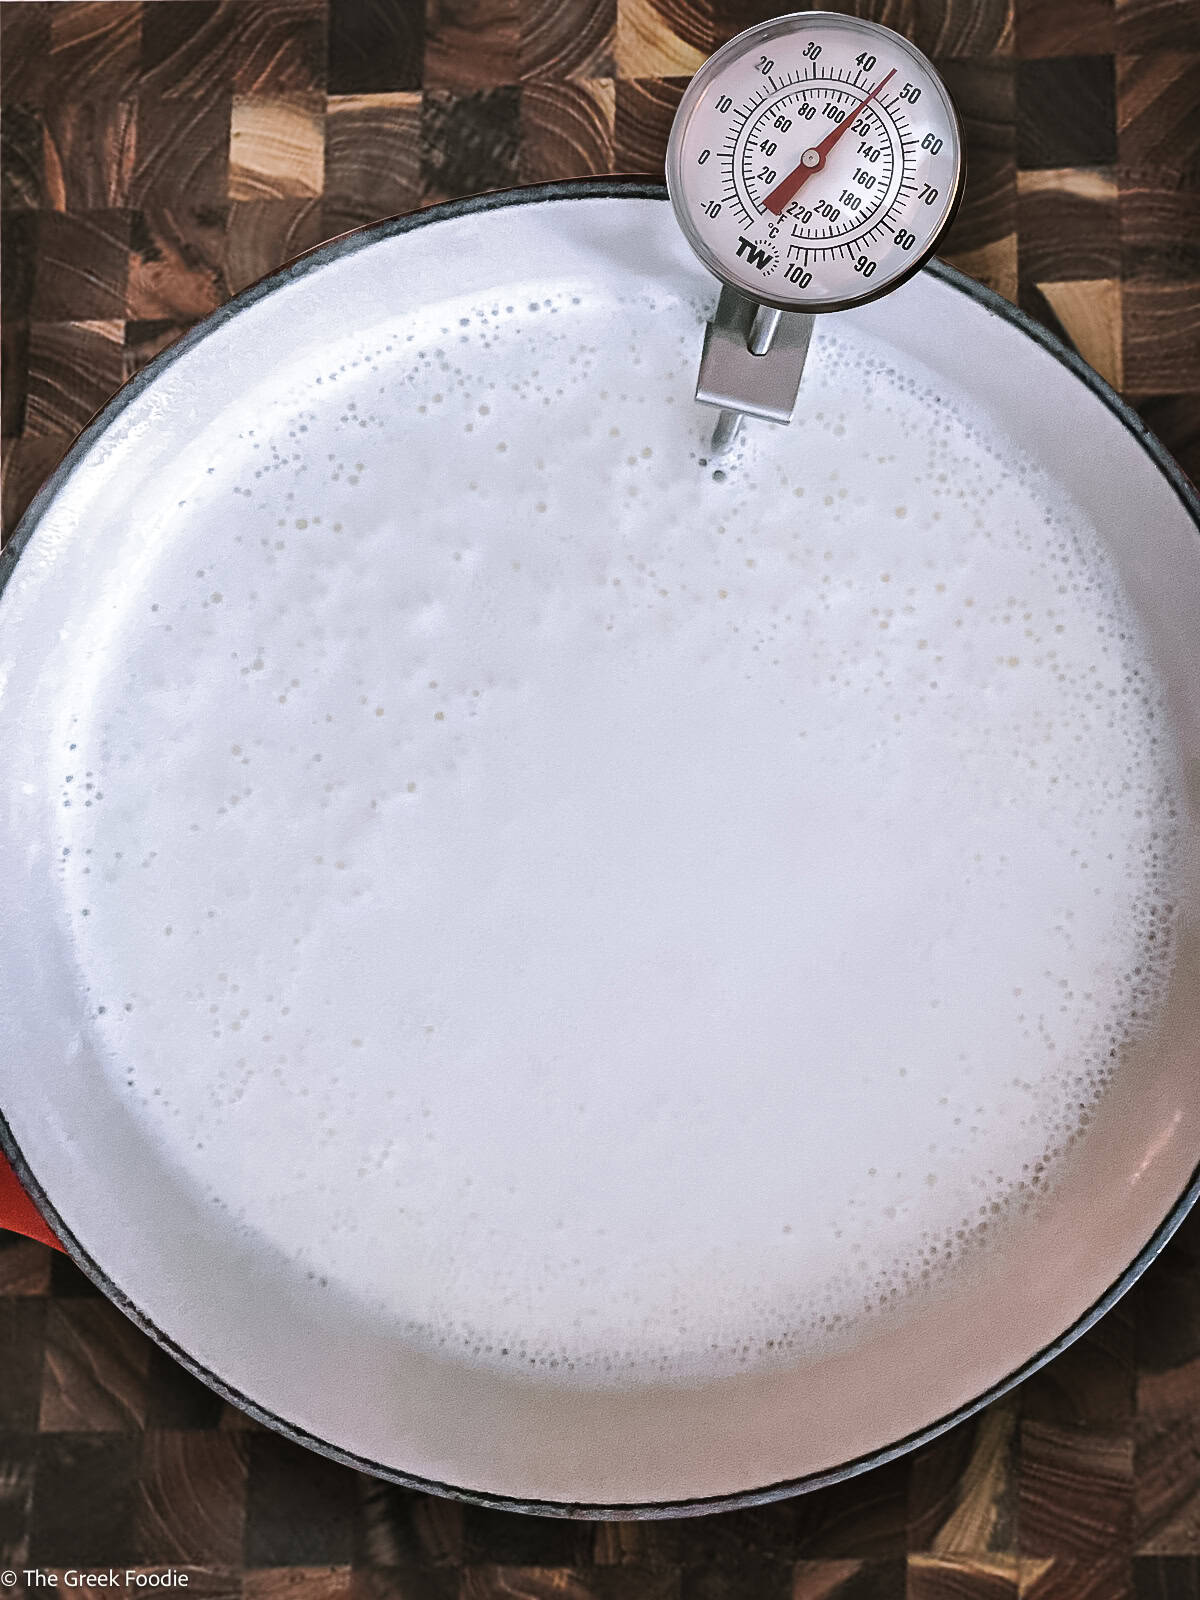
Step 2: Let the milk cool for 22-24 minutes until the milk temperature reaches 113°F / 45°C.

Pouring milk in a saucepan full of milk.

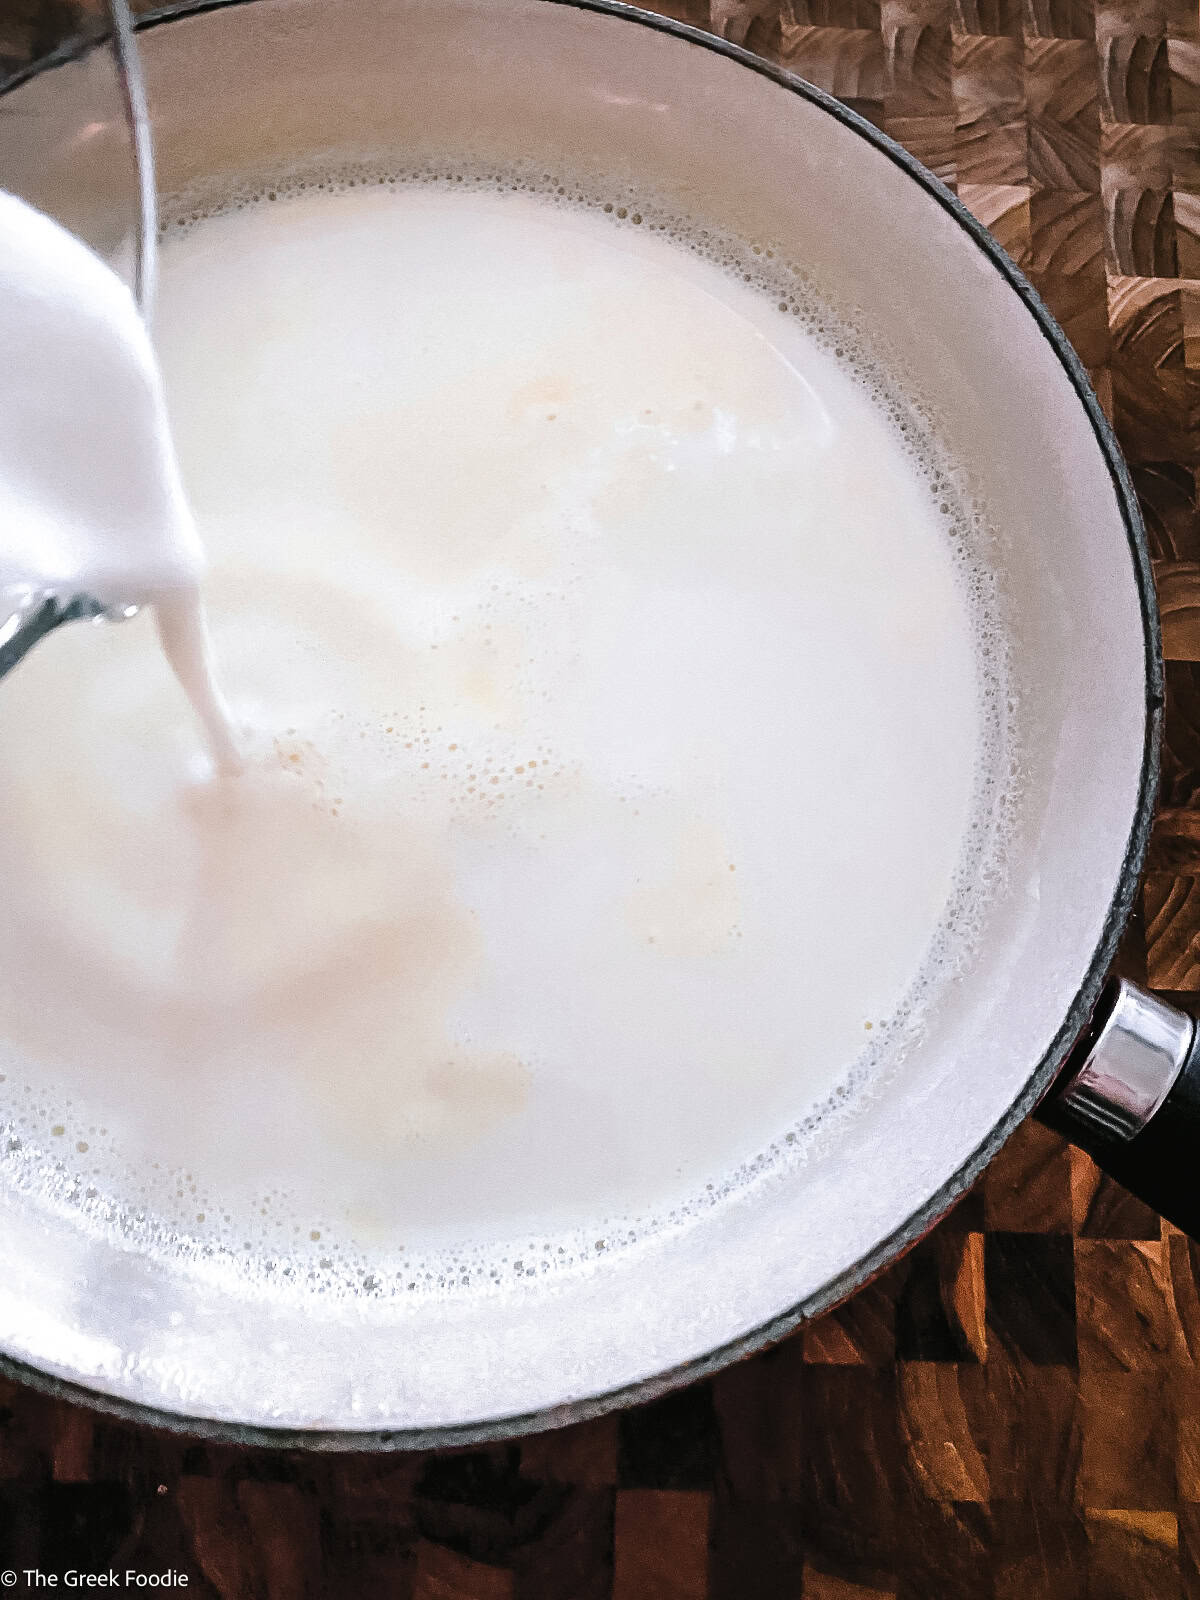
Step 3: Using a glass or bowl, add a full tablespoon of yogurt and half a cup of the warmed milk. Mix well with a whisk and add it to the pot with the rest of the milk. Mix well.

A saucepan in a microwave with the light on.

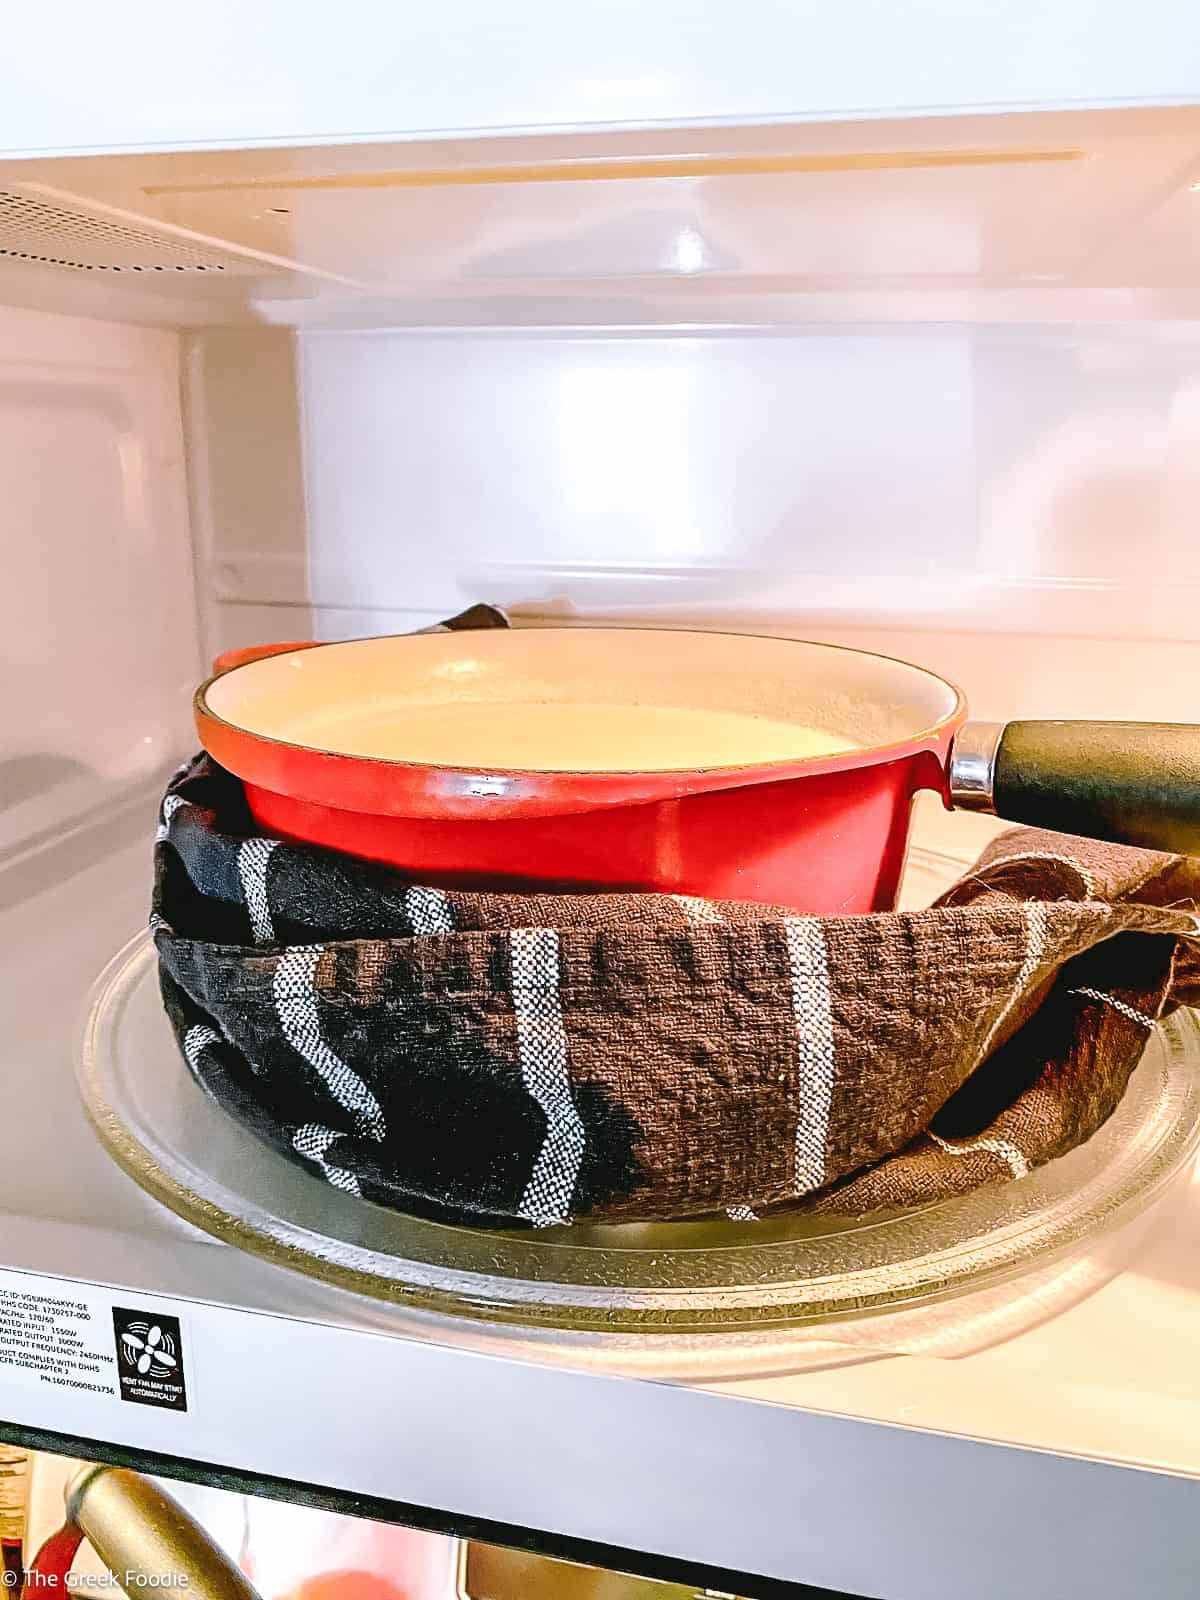
Step 4: Now the yogurt needs to thicken in a warm environment. So I place it in my microwave oven with the light on under it. I find it is warm enough. Leave the pot in the warm oven for 6-8 hours.
*Alternatively, warm your oven to 113°F / 45° C (see Recipe notes).

Yogurt straining through a cheese cloth in a big bowl.

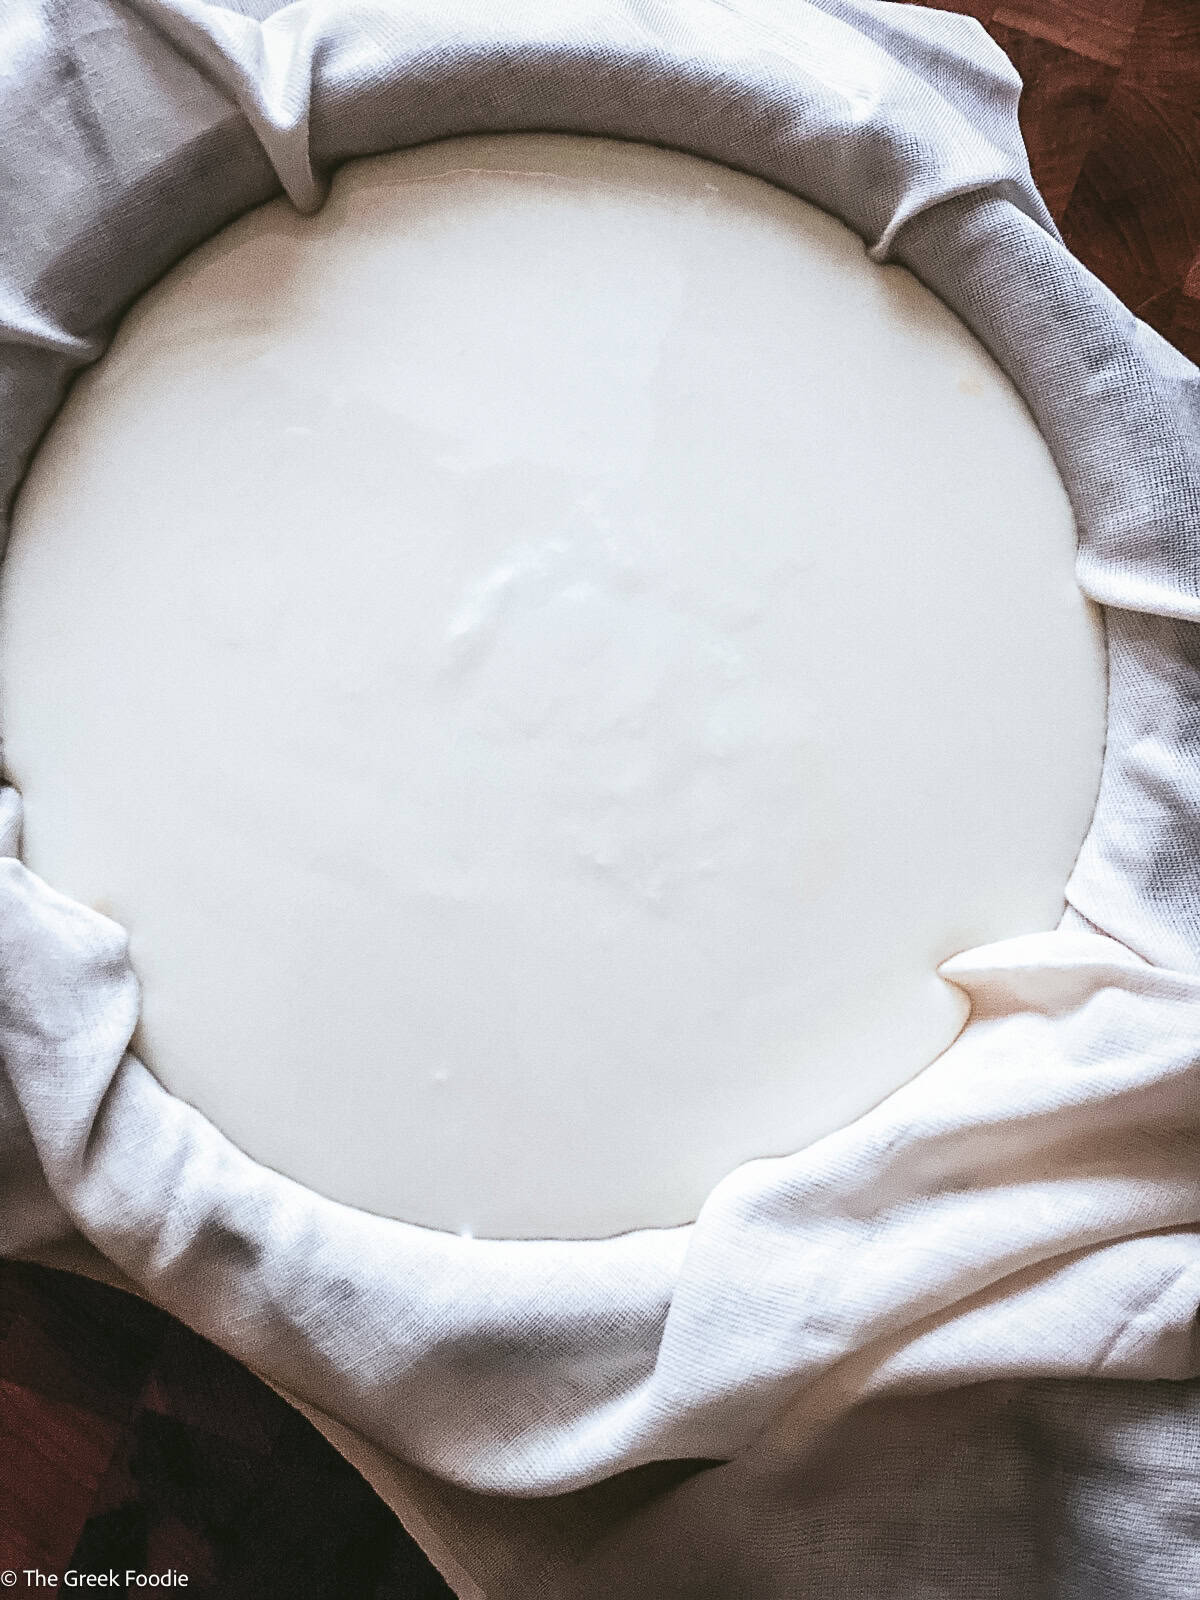
Step 5: Line a mesh sieve with the cheesecloth. Place the mesh sieve over the tallest bowl or pot you have to allow the liquids to gather on the bottom without touching the strainer and cheesecloth.
Pour the yogurt into the cloth. Tie the cloth loosely around the yogurt and place it in the fridge for at least 3 hours.
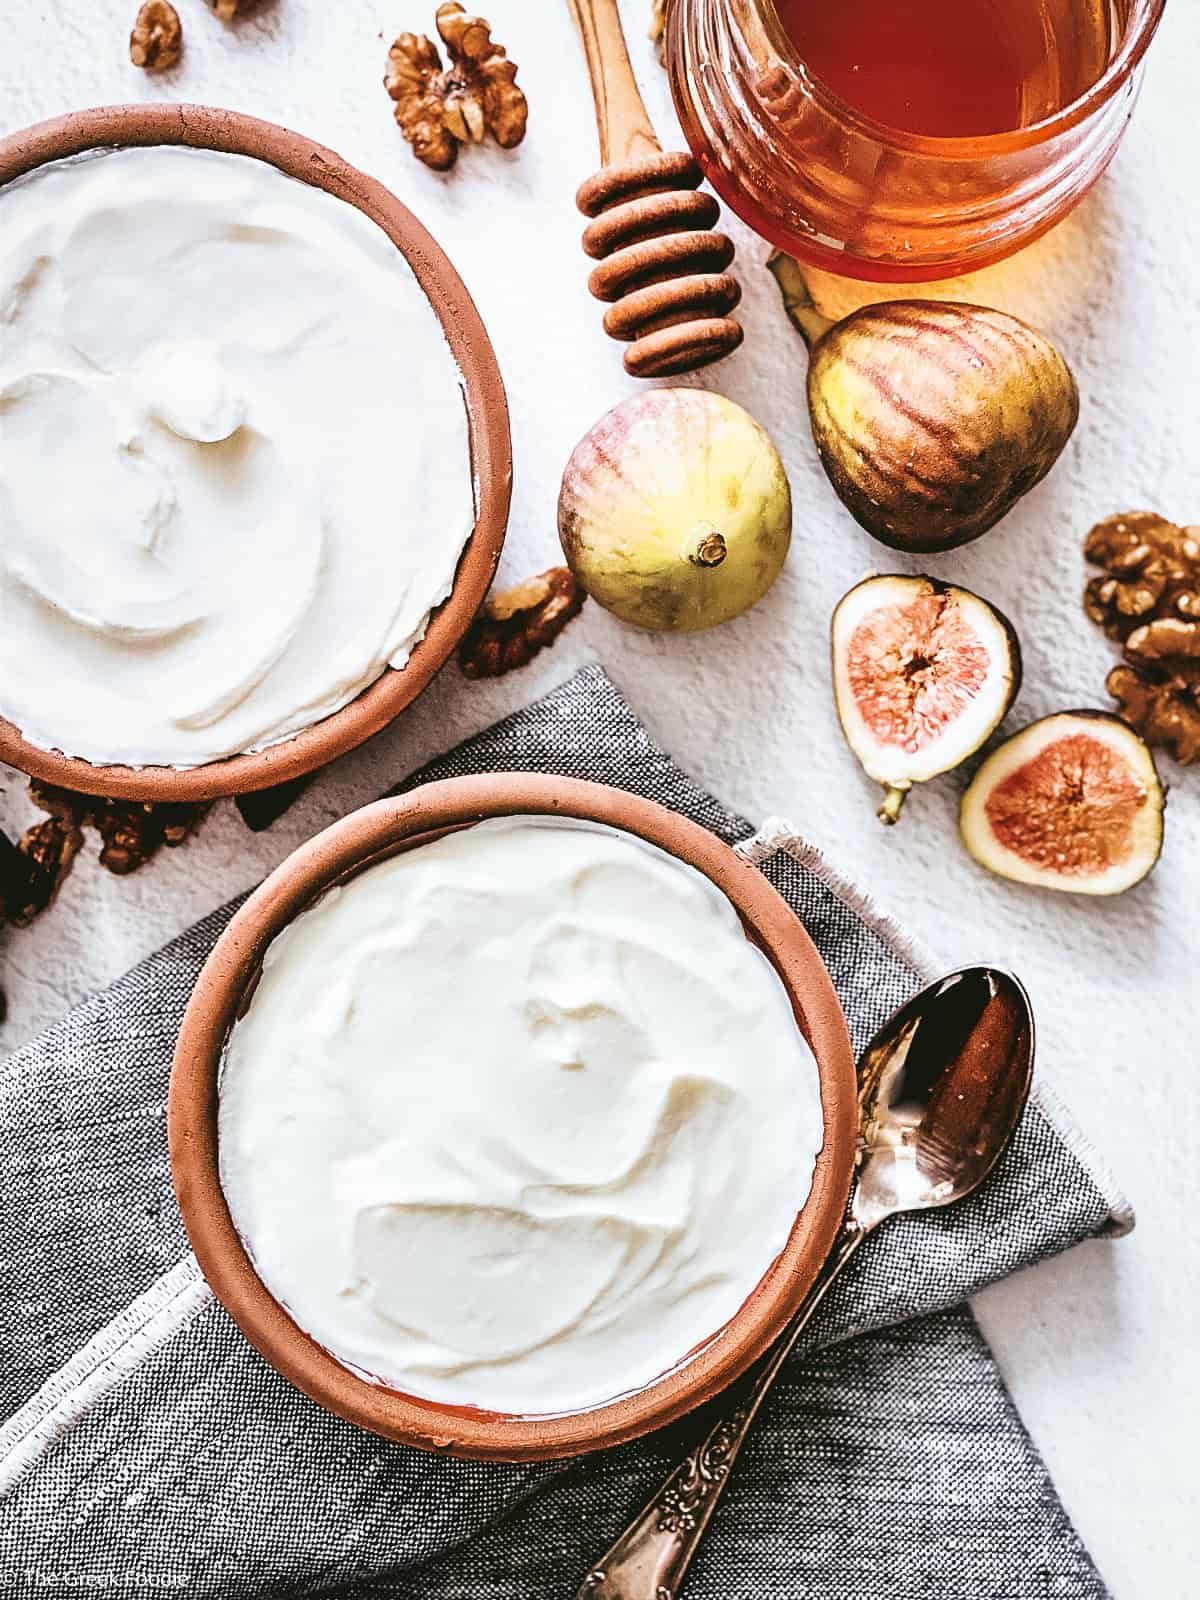
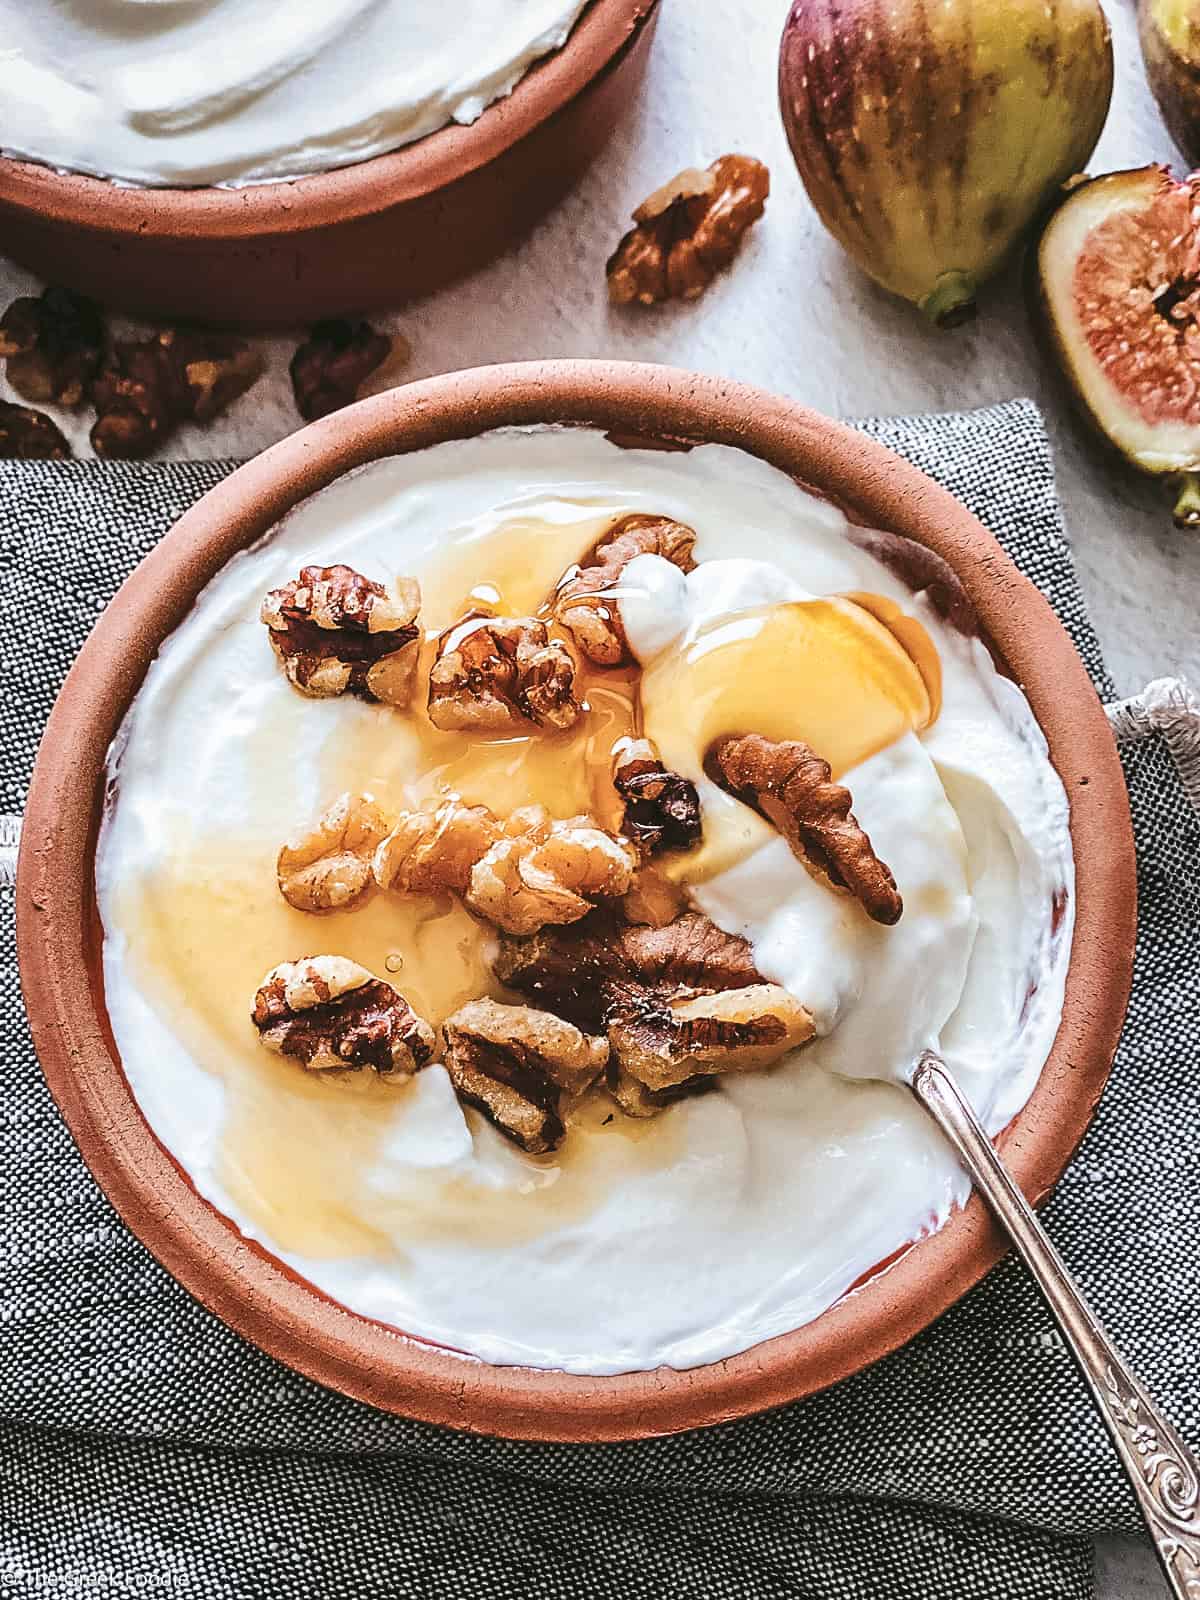
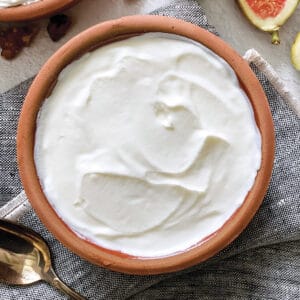
Your homemade Greek yogurt is ready!

Two ceramic bowls with yogurt, a spoon on a cloth napkin, fig halves, walnuts, a honey dipper and a jar with honey. and a detail of another bowl.

Tips & tricks

  • Use a fresh starter. Whether it’s store-bought or a bit from your last batch, make sure it’s less than a week old for the strongest, most active cultures.
  • Don’t throw away the whey. The liquid that drains from the yogurt is full of protein and probiotics. Use it in smoothies, soups, bread dough, oatmeal, or anywhere you’d add liquid.
  • Create a warm “incubation spot.” I use the microwave above the stove; the light underneath keeps the temperature stable. You can also use your oven with just the light on.
  • Fast-ferment method: Warm your oven to 113°F / 45°C, turn it off, then place your covered yogurt inside. Check after 3–4 hours for thickness.
  • Straining time changes texture.
    Light strain: 30–45 minutes
    Medium strain: 1–2 hours
    Thick Greek yogurt: 3–4 hours
    Very thick “labneh”: overnight
  • Use full-fat milk for the creamiest results.

Storage Tips for Homemade Greek Yogurt

  • Refrigeration: Store in a clean, airtight container for 10–14 days.
  • Avoid contamination: Always use a clean spoon — no double-dipping. It dramatically extends freshness.
  • Freezing: You can freeze Greek yogurt (up to 2 months), but it may separate. It’s best for smoothies or baking after thawing.
  • Stir before serving: Some natural separation is normal. Stir it back in or drain it for thicker yogurt. My grandmother used to tuck a piece of stale bread or rusk inside the container — the bread absorbs excess moisture naturally.

FAQs

Your milk may have cooled too much, or your starter was too old. Also, temperatures above 46°C / 115°F can kill the cultures. Keep the milk between 43°C-45°C / 110–113°F when adding the starter for best results.

Anywhere from 3–12 hours.

  • 12 hours = very tangy, probiotic-rich
  • 3–4 hours = mild flavor
  • 6–8 hours = classic tangy Greek yogurt

Yes, as long as you use it within 7 days. After that, the cultures weaken.

Whole cow’s milk gives the best texture. Low-fat milk makes thinner yogurt and may require longer straining.

Use whey in smoothies, soups, oatmeal, bread dough, pancake batter, or anywhere you’d normally add water or milk. It’s high in protein and probiotics.

A bowl with yogurt, a honey dipper dripping honey, a spoon on a cloth napkin, fig halves, walnuts, and a detail of another bowl.

How to enjoy Greek yogurt

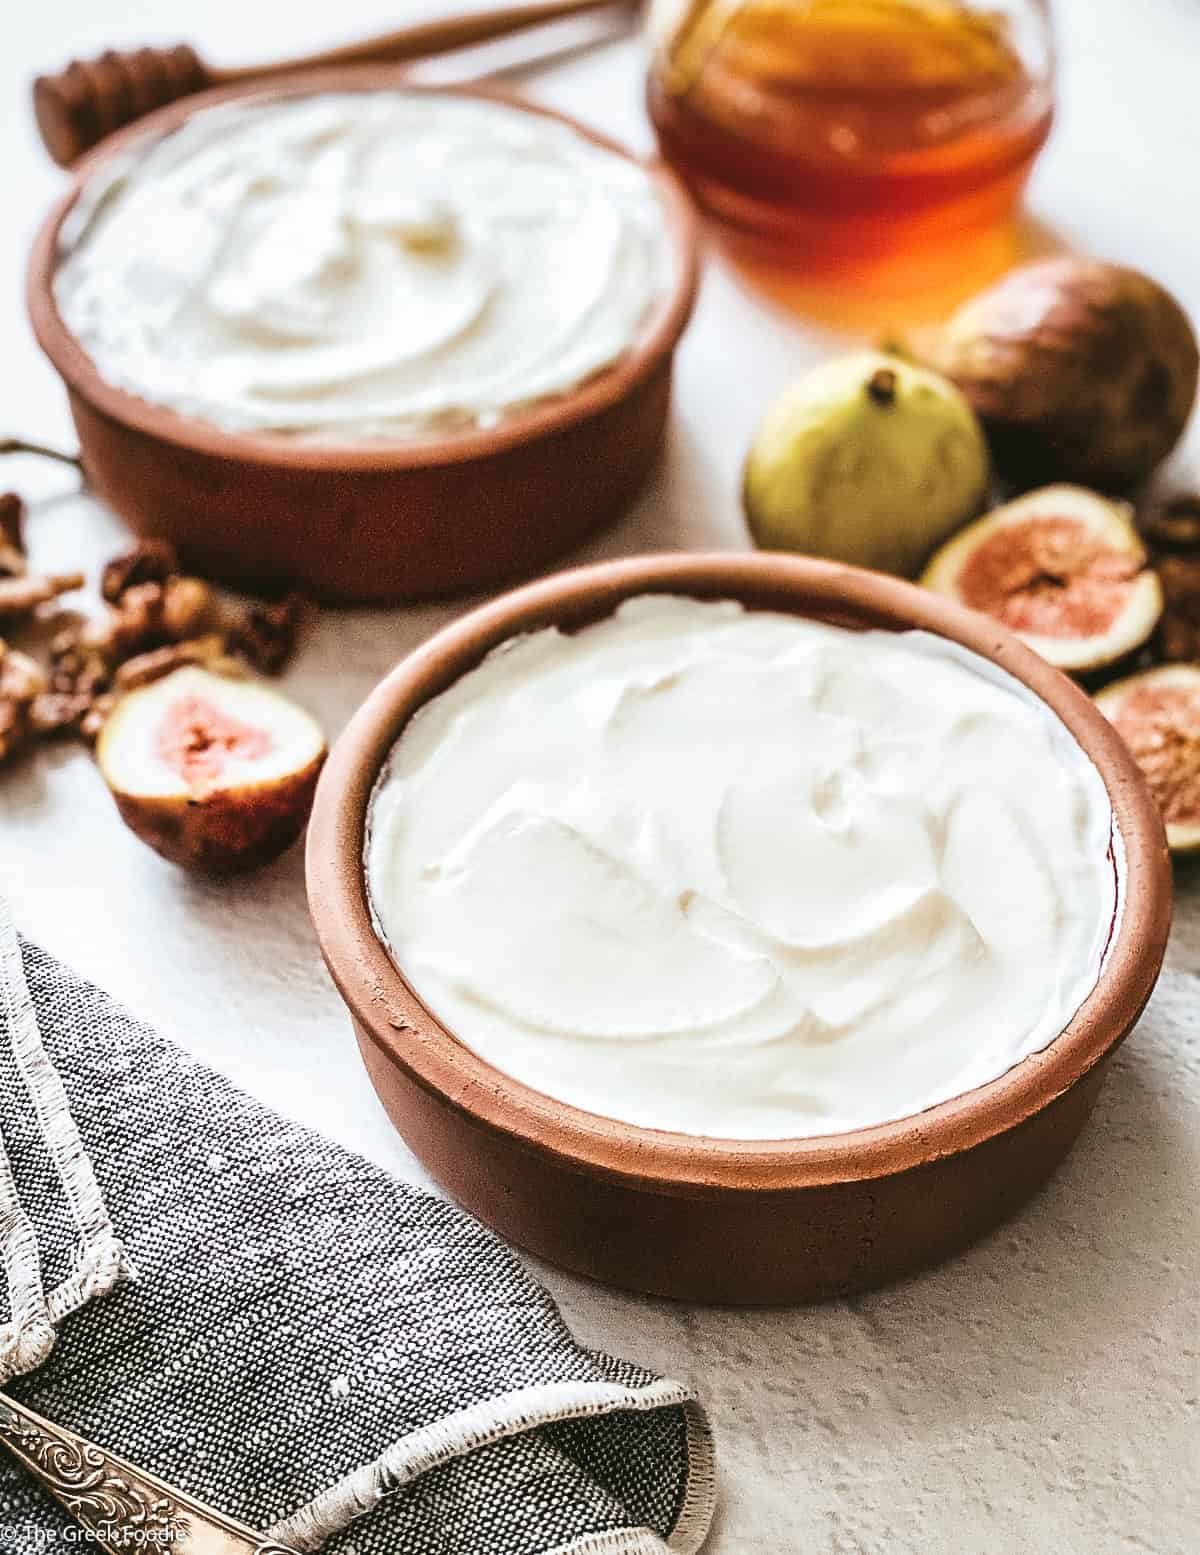
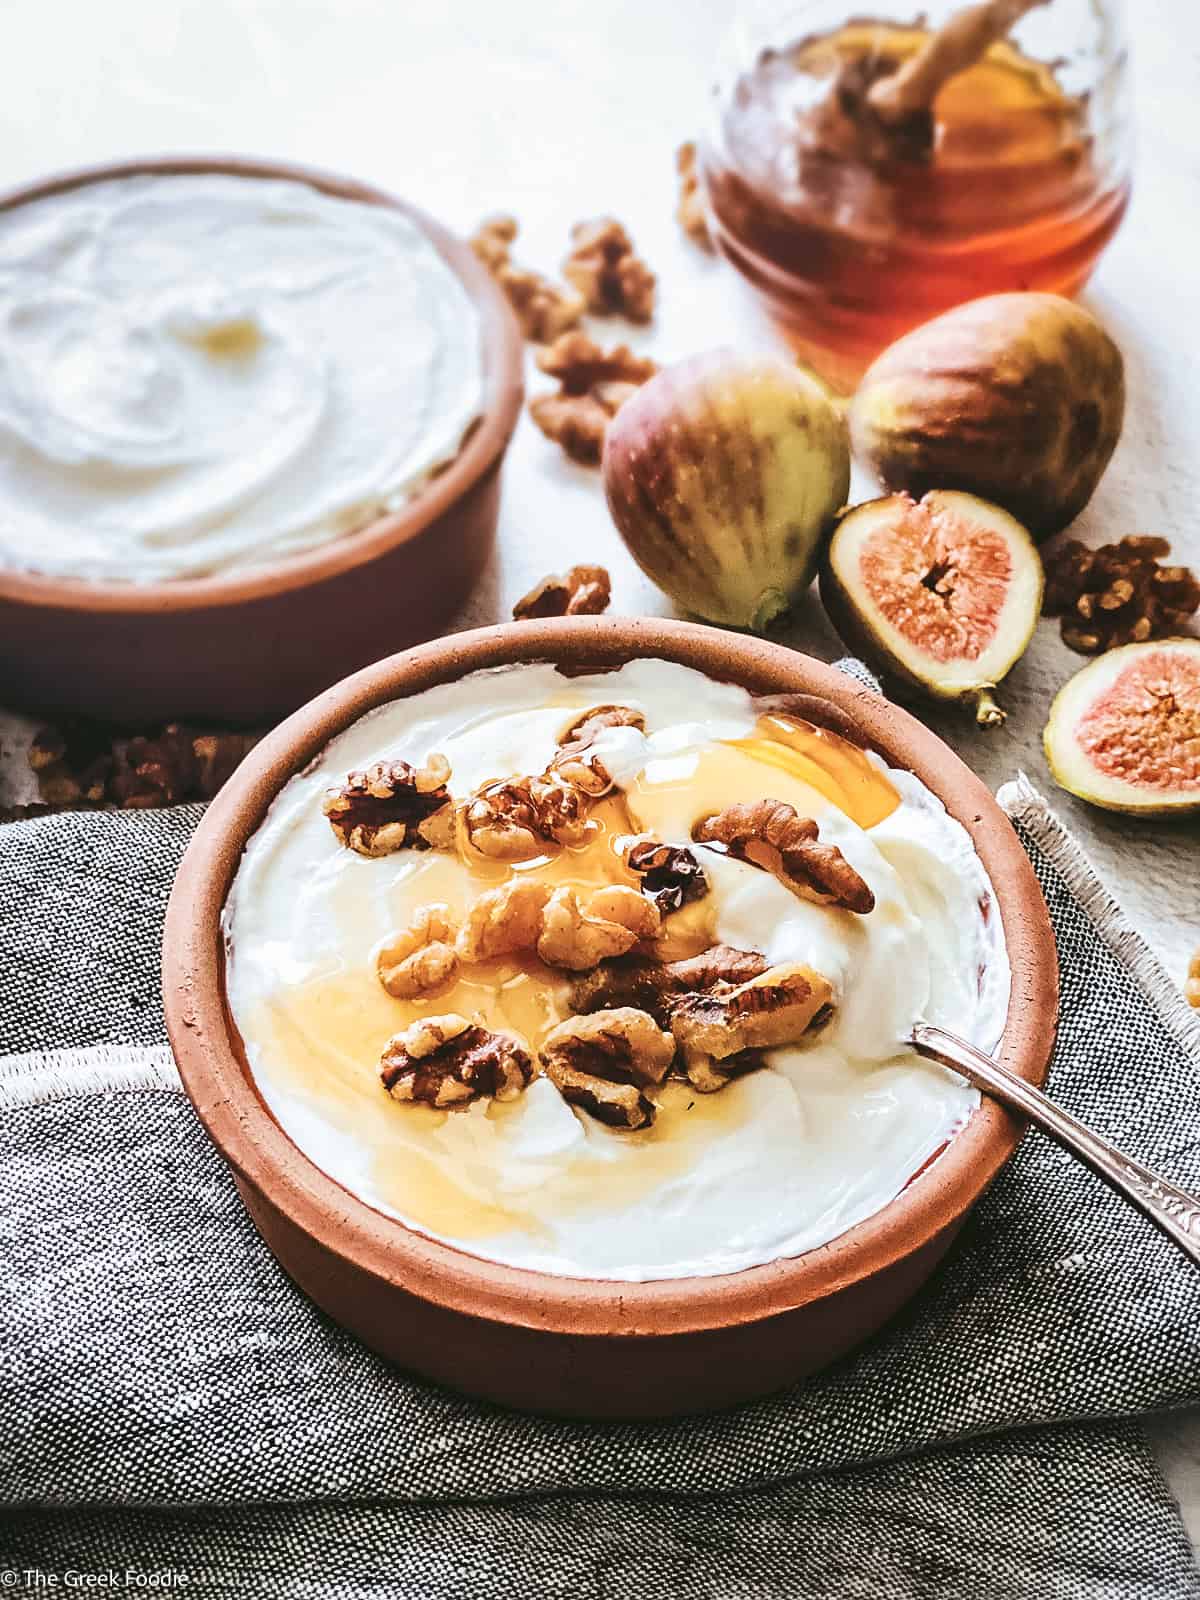
  • Greeks love yogurt served as a dessert with honey and walnuts. It is so good! Tavernas often serve it this way to their customers as a thank you at the end of the meal.
  • Try it with fresh berries & granola – A go-to breakfast or snack.
  • Make tzatziki yogurt dip! It’s an ideal addition to a classic souvlaki with pita, fragrant zucchini fritters, or vegetable crudités.
  • Make cauliflower fritters with Greek yogurt & parmesan. They are ready in 20 minutes!
  • Use it as a sour cream swap. Use on baked potatoes, tacos, or nachos for extra protein.
  • Topping for chili or stews. Adds a cool, creamy contrast to spicy dishes.
  • Add Greek yogurt to your smoothies. Boost protein and creaminess without extra sugar.
  • As a base for ranch or blue cheese dressing. Lighten up classic dressings without losing flavor.
  • Use yogurt in a marinade. Add a cup of yogurt to a mixing bowl and add seasonings like freshly ground pepper, dry oregano, thyme, pepper flakes, za’atar, crushed garlic, and some olive oil. Add chicken pieces, cover them well with the yogurt mixture, and let them marinate for a few hours. Yogurt is a natural meat tenderizer. Grill the chicken and serve it with a traditional tomato salad and cut up Greek pita bread. It will be the juiciest chicken ever!
A bowl with yogurt, honey and walnuts, a spoon on a cloth napkin, fig halves, another bowl with yogurt and a jar with honey.

Cooked it? Rate it!

Please leave a comment, we love hearing from you! Subscribe to our newsletter and follow us on FacebookPinterest, and Instagram for the latest updates.

The Greek Foodie Logo in yellow and black.
A ceramic bowl with yogurt on a cloth napkin, fig halves above it and a corner with another bowl with yogurt and a spoon.

How To Make Greek Yogurt

by Jenny Skrapaliori Graves
Make perfect creamy greek yogurt with only two ingredients.
5 from 17 votes
Prep Time 5 minutes
Cook Time 22 minutes
Resting time 6 hours
Course Breakfast, Dessert
Cuisine Greek
Servings 4
Calories 155 kcal

Equipment

  • Large pot
  • a cheese cloth
  • A milk thermometer
  • a mesh sieve

Ingredients
  

  • 1000 ml organic grass-fed whole milk about 4 cups
  • 1 tablespoon greek yogurt full fat

Instructions
 

  • Place milk in a pot with a thick bottom and place it on low to medium heat. Simmer milk for 18-20 minutes until milk temperature reaches 185° F / 85° C.
    Remove from the heat.
  • Let the milk cool for 22-24 minutes until the milk temperature reaches 113°F / 45°C.
  • Using a glass or bowl, add a full tablespoon of yogurt and half a cup of the warmed milk. Mix well with a whisk and add it to the pot with the rest of the milk. Mix well.
  • Now the milk needs to ferment and thicken in a warm environment.
    Method A: Place milk in the microwave oven with the light on under it. Leave the pot in the microwave oven for 6-8 hours.
    Method B: Warm the oven to 113° F / 45° C and let milk rest in there. Check thickness after 3-4 hours.
  • Line a mesh sieve with the cheesecloth. Place the mesh sieve over the tallest bowl or pot you own to allow the liquids to gather on the bottom without touching the strainer and cheesecloth.
    Pour the yogurt into the cloth. Tie the cloth loosely around yogurt and place it in the fridge for at least 3 hours.
    The yogurt is ready!

Notes

  • Get a good full-fat yogurt with live active cultures, such as Fage. Thin a tablespoon first with some of the warm milk, then stir that into the pot.
  • You can also buy freeze-dried starter cultures, which look like powder and can be stirred right into the milk. Cultures for Health sell basic yogurt cultures and specific ones tailored for Greek yogurt.
  • Save a few tablespoons of your yogurt batch to use on your next one as a starter. 
 
Nutritional Info – Please keep in mind that the nutritional information provided is only an estimate and can vary based on the products used.

Nutrition

Calories: 155kcalCarbohydrates: 12gProtein: 8gFat: 8gSaturated Fat: 5gPolyunsaturated Fat: 1gMonounsaturated Fat: 2gCholesterol: 25mgSodium: 109mgPotassium: 335mgSugar: 13gVitamin A: 405IUCalcium: 287mgIron: 1mg
Tried this recipe?Mention @thegreekfoodie__ or tag #thegreekfoodie__
How To Make Greek Yogurt

Similar Posts

5 from 17 votes (7 ratings without comment)

Leave a Reply

Your email address will not be published. Required fields are marked *

Recipe Rating


18 Comments

    1. Hi Vicky, No I have never made it in the instant pot. I always found the stove top really easy.
      But if your instant pot has a yogurt button I assume you use it as they advise, use the ingredients for the Greek yogurt and strain it. That’s what makes it different. Greek yogurt is strained in a cheese cloth, that makes it thicker and intensifies the flavor. Hope that helps! x Jenny

  1. 5 stars
    This looks so fun! I’ve never made greek yogurt or any yogurt at home so I’m excited to try it!

  2. 5 stars
    I love Greek yogurt but somehow it’s more expensive than other types of yogurt where I live. I didn’t know it was this easy to make. Definitely going to start making my own!

  3. 5 stars
    My husband takes Greek Yogurt to work almost every day, it’s such a great source of protein. I can’t wait to make it at home, I bet it is so much better than store bought!

  4. 5 stars
    I didn’t even realize you could make your own Greek yogurt! I have it everyday…it’s so healthy and delicious. I cannot wait to try it myself now! This looks perfect.

  5. 5 stars
    I had meant to make greek yogurt for ages, so happy I found your recipe! I made this today and turned out great! The consistency was perfect and it tasted delicious. I made it for a vegetarian friend and she loved it! Thanks for sharing such wonderful recipe!

  6. I love your website! I always wanted to know the authentic greek yogurt recipe, unfortunately my Greek grandmother who made it, died before I could get the recipe from her. Anyways, I just made the yogurt and added honey to it at the end & it’s really yummy! I was planning on saving a bit for my next batch, like you said, but now that there is honey in it… is it contaminated? Will that affect the live cultures and mess up my next batch?

    1. Hi Tori,
      Thank you for your kind words.
      So happy you made the yogurt! Great idea to add the honey!
      About the starter, the good thing is your flavoring is just honey which is a great ingredient, with no funny chemicals or add-ons. You should be ok to use it as a starter for your next batch. But you can always use a small container of Greek yogurt like Fage to be sure. I can’t guarantee the results otherwise because I haven’t tried it myself.
      Keep me posted on what you decided and how it came out!

      Thanks so much,

      Jenny

  7. Hi – I’m wondering what you mean by saying “leave the light on under it” when you put the yogurt in the microwave. I see you have a dishtowel wrapped around the bottom on the dish, but what kind of microwave do you have with a light underneath that keeps the bowl warm enough for proofing.

    Thank you so much for this recipe. I can’t wait to try it out this weekend!!

    p.s. How much yogurt should this yield?

    1. Hi Li,

      Most microwaves in the USA are above the stove. Therefore, they also serve as an additional source of light while you are cooking. My microwave, for example, has two lights under it and I have the option to have these on. They create a warm-enough temperature inside the microwave, allowing it to serve as my proofing cabinet.
      Alternatively, you can place the yogurt in a very low temp oven. It would help if you had an oven thermometer for this method. First, turn your oven to the lowest temperature, usually 93°C / 200°F. Once it reaches 43°C / 110°F, turn the oven off. Place the yogurt inside and close the door. The oven will eventually stabilize to a lower temperature, warm enough for the yogurt.

      This recipe yields about two cups of delicious yogurt.

      Please come back and let me know how you liked it.

      Thank you so much!

      x Jenny

    1. Hi Emma,

      your homemade yogurt is generally good for eating for up to 2 weeks, when stored in the refrigerator.
      When I make a batch we consume it in a day or two so I would recommend keeping it for up to week just to be safe.

      Thanks so much,
      x Jenny

  8. 5 stars
    I totally understand that people are excited to try this recipe. It would be very helpful if you’ve made the recipe, then rate it–otherwise the 5 star review makes zero sense. People want real tried & true reviews. I love trying new & healthy recipes and thank the author for sharing the recipe. I tried it and used option 2: oven method. Perfect after 4 hours. Topped it w/fresh blueberries & local honey. Delish!